Using Mailing Lists
Importing the list
First, create a .csv file containing email address, first name, last name, and company with each record separated by semi-colons. Header fields should be included in the csv for Email Address, First Name, Last Name, and Company. You are only required to have data for the customer email, so name and company may be omitted, but it is always best to have a name attached to an email account.
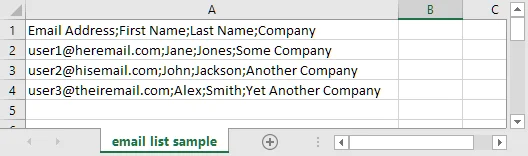
Your .csv file should look like this example.
After you have completed created the .csv file, open the FlickRocket admin and choose Marketing>Emailing>Mailing Recipients. On the Mail Recipients page, click the Add List button, enter a name for the mailing list, and click the Import users from CSV. When the file upload window appears, press the Add files button, browse to the CSV file, and click Start. On completion of the list import, you should see the data that has been imported along with the total number of emails imported. Verify the information and click Save.
Creating the email content template
The next step is to create the email content template. This is an HTML template with variables for key data that will be gathered from the platform or replaced with unique data when the email is sent out.
To create the content, choose Marketing>Emailing>Manage content. Click the New Content button (or you could choose an existing template if you have previously created one). Once the Create new templates page opens, enter a name for the template, add the subject, and paste or type in your text. Note that this must be formatted in HTML.
If you select the “Click here for information about supported tags”, you will see a list of support variables. Variables are easily identified in the HTML text and will be replaced with the correct data when sending out the email. For example, %FIRSTNAME% will be replaced by the first name of the customer when the email is sent. Again, make sure you format your text using HTML tags such as the paragraph tag. Adding the %UNLOCKCODE” variable will result in the customer receiving a unique code that can be redeemed for access to products. To preview, make certain you have selected the theme used by your shop and click Show. Once you are satisfied with the preview, click Save.
Creating the email send-out
The last step involves creating a Send-out. The send-out is used to specify who receives the email, under what conditions (or triggers) and the parameters of any unlock codes, gift certificates, or discount codes. For example, in the send out, you determine the product or products for the unlock code, the license, and the expiration date of the code.
To create a new send-out, choose Marketing>Emailing,>Manage Send-out and then click New Send-out. When the Create new send-out page appears, enter a name for the send-out, an email for the from field, and choose the email list you created from the Recipients dropdown. Next, in the Design and Content section, select the email content template you created. You may see an error warning if using unlock codes or certificates. If you want to use the Unlock Code option, change it to Yes. Then select the product and add it, set the desired license, and add some meaningful comment. The customer will not see this comment. It is strictly for internal use. Last, click “Save and send sample to me” to test. Once you are satisfied and are ready to send out the emails, just click the Send Now button.
That’s it! You can now send out your own emails.
You may also want to look at some of the other triggers that can be set to target selected customers with offers, news, general information, and even abandoned carts. Some of those triggers include country, native language, product purchased, license assigned, and the type of product. You can also control when those emails are sent out.
Note: This functionality is included witrh Silver and Gold Plans. Basic Plan members would need to purchase the E-Mailing Extension app.
Using Mailing Lists (Quick steps)
Importing the list
- Create .csv file with the fields email, First Name, Last Name, Company separate by semi-colons. Name and company are optional, but semi-colons are required if omitted. The header should be included. An example is as follows:
Email Address;First Name;Last Name;Company
user1@heremail.com;Jane;Jones;Some Company
user2@hisemail.com;John;Jackson;Another Company
user3@theiremail.com;Alex;Smith;Yet Another Company
- Open the FlickRocket admin and choose Marketing>Emailing>Mail Recipients.
- Click Add List and enter a name for the list.
- Select Import users from CSV.
- When the file upload window appears, press the Add files button, browse to the CSV file, and click Start.
- Verify the imported data.
Creating the email content template
- Choose Marketing>Emailing>Manage Content.
- Click the New Content
- Enter a name for the template, add the subject, and paste or type in your text. Note that this must be formatted in HTML.
Creating the email send-out (with an Unlock Code)
- Choose Marketing>Emailing>Manage Send-out.
- Click the New Content
- When the Create new send-out page appears, enter a name for the send-out, an email for the from field, and choose the email list you created from the Recipients
- In the Design and Content section, select the email content template you created.
- Change the Unlock Code option to Yes, select the product and add it, set the desired license, and add some meaningful comment.
- Click “Save and send sample to me” to test.
- Once you are satisfied and are ready to send out the emails, click the Send Now